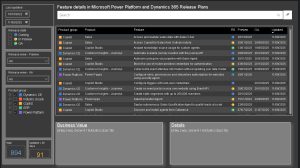
If you work with Power Platform or Dynamics 365, you’ll know that keeping up with updates via Microsoft’s official site can be a bit tedious. That’s why Jukka Niiranen and Wouter Kessener created a Power BI report that transforms the experience into something far more practical: Release Plans Visualized.
Filters, search options, and visualizations that make exploring the plans more intuitive.
Quick access to current, past, and upcoming release waves (e.g., 2025 wave 1 and wave 2).
A change history for each item — something not always available on the official site.
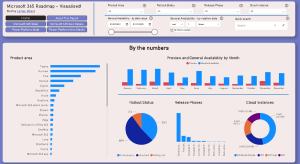
Recommended complement: If you also work with Microsoft 365, check out m365roadmap.com, another Power BI report built with a similar philosophy:
If you’ve been searching for a free and efficient way to track the evolution of Microsoft products and release plans—especially across Power Platform, Dynamics 365, and related workloads—these resources should be your go-to source, together, they offer a practical and accessible alternative to paid components or more complex official tools
Simplifies Queries: A view encapsulates the underlying complexity, allowing users to query a more simplified, logical data structure.
Improved Maintainability: Changes to the underlying tables/logic can be made in the view definition, instead of updating multiple queries.
Performance Optimization: The database engine can potentially optimize the view’s execution plan and cache it for faster subsequent queries.
Cons:
Initial Performance Hit: Creating a view involves compiling the underlying query, which can take time, especially for complex views.
Potential Complexity: Nested views or views with complex logic can be harder to understand and maintain.
Materialization Overhead: If the view needs to materialize data (e.g., with a WITH clause), there is an overhead in storing and maintaining the materialized data.
Executing a Stored Procedure:
Pros:
Tailored Optimization: The stored procedure can be specifically designed and optimized for the task at hand, potentially outperforming a generic view.
Encapsulated Logic: The stored procedure can contain custom business logic, error handling, and other functionality that may be difficult to replicate in a view.
Parameterization: Stored procedures can accept parameters, allowing for more flexible and targeted execution.
Cons:
Maintenance Overhead: Changes to the underlying logic require updating the stored procedure, which may impact dependent applications.
Lack of Reusability: Stored procedures are typically more specialized and may not be as reusable as a well-designed view.
Execution Overhead: Each execution of the stored procedure incurs the overhead of compiling and running the entire procedure.
A few factors to consider:
Frequency of Use: If this is a frequently executed task that is part of a critical reporting or ETL process, using a materialised view or table might be more efficient than executing the complex query each time.
Data Volume: If the underlying data is large, the performance benefits of a materialized view or table may outweigh the initial overhead of creating and maintaining it.
Complexity of the Query: The more complex the logic in the procedure, the more likely a materialized solution (view or table) will provide better overall performance.
To determine the best approach:
Analyze the execution plan of the stored procedure to identify any performance bottlenecks or areas for optimization.
Test the performance of the stored procedure versus a materialized view or table, using representative sample data or a production-like environment.
Consider the maintenance and flexibility requirements of your solution – a view may be more suitable for frequently changing requirements, while a materialized table may be better for more static reporting needs.
Ultimately, the decision should be based on a combination of performance testing, maintainability concerns, and the specific requirements of your use case. It’s worth exploring both options and comparing their tradeoffs to determine the best approach for your needs.
Your Tenant must be a part of CCP channel https://aka.ms/JoinCCP, and have opted-in with a test tenant for the Private Preview ring through this form.
End user must have a valid Microsoft 365 E5 or equivalent.
End user must have at least one of these service plans : “Information Protection for Office 365 – Premium AND/OR “Azure Information Protection Premium P2”.
End user must be in the Office Insiders Beta channel
You must have valid permissions to be able to configure/update a DLP policy.
Connected experience must NOT be disabled explicitly using regkey. By default this office wide setting is enabled (Optional connected experience is no longer required)
Minimum Outlook Build – 16.0.17315.20000
What´s New
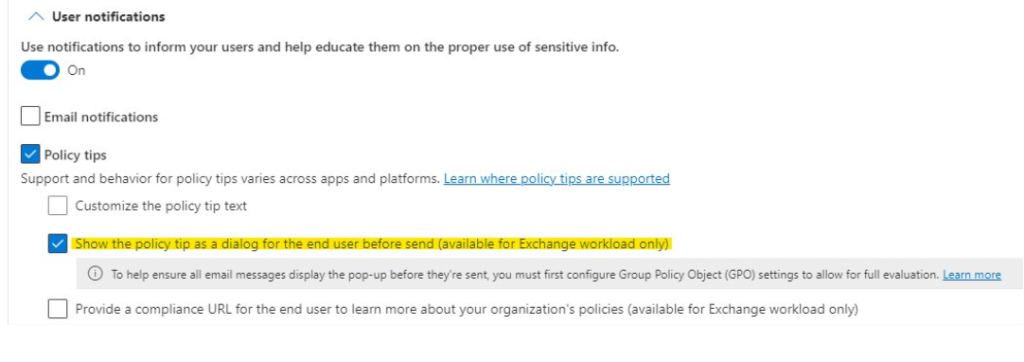
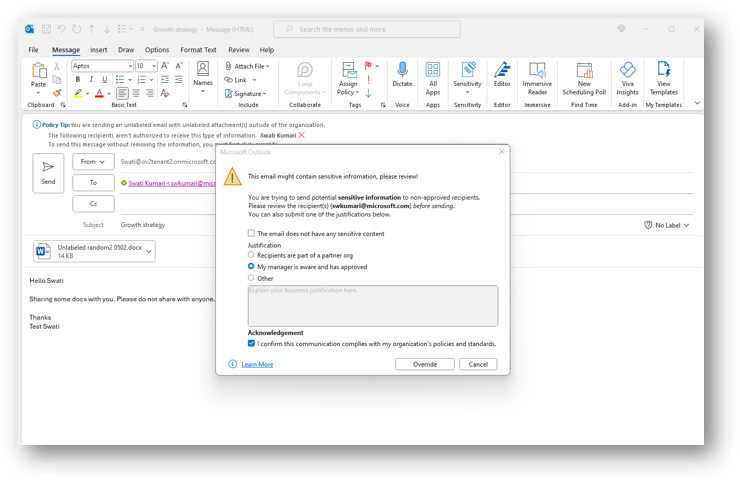
There are some significant enhancements made to the DLP oversharing feature, aka the Block, warn, justify popups before sending sensitive/unlabeled/specifically labeled emails.
Customizable Oversharing Popup: You can now optionally tailor your oversharing dialog by customizing the title, body, and include dynamic variables such as matched recipients. (Stay tuned as we roll out additional support for matched labels and attachment filenames variables in the coming month)
DLP Predicates support for Policy Tips and Oversharing: Enhance your oversharing protection with expanded support for DLP predicates. Now, you can enforce Policy tip & Oversharing dialog support for below new DLP predicates:
Content is not labeled – Detects if there is no label in the entire email envelope
Message is not labeled – Detects if message body has no label
Attachment is not labeled – Detects if there is any attachment without a label
File extension – Detects the specified file extension & can be used accordingly in combination with other predicates
Keep an eye out as we introduce support for attachment contains and message contains (Targeted “Content contains”) in the upcoming month.
Existing: Default Oversharing dialog
So far, you could only use default Oversharing dialog using above Purview UX or below cmdlet. Default dialog shows the Policy tip strings in the dialog along with any override options (as configured by admin)
-NotifyPolicyTipDisplayOption Dialog
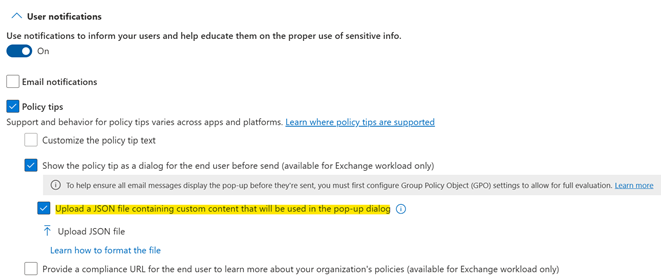
Going forward, you can also choose to customize this dialog using steps in the next slide. If you don’t customize, default Oversharing popup will continue to show to end users.
New: Customizable Oversharing dialog
Steps-
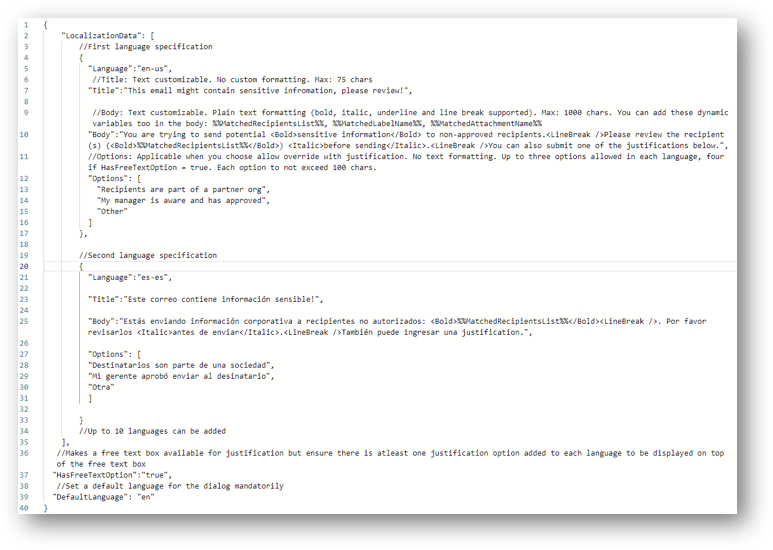
Prepare a JSON file like shown on the right. (//Comments have been added to explain each attribute & the constraints. Please go through those in the screenshot. For any mismatch, there will be an error shown on PowerShell.)
You can add the dynamic variable %%MatchedRecipientsList%% in this format in the custom dialog’s body
All the JSON attributes like “LocalizationData”, “Language”, “Title”, “Body”, “HasFreeTextOption”, “DefaultLanguage”, are case sensitive. If there is any error, it will default to default Oversharing dialog with Policy tip strings.
Regarding override, please note that the text is NOT customizable for Acknowledgement and False positive overrides. Only the justification options are customizable.
The two dynamic variables or tokens (%%MatchedLabelName%% and %%MatchedAttachmentName%% will be rolled out in March. It would then look like below. Until then, it would not return anything in the dialog for end users.
Sample JSON file
1. Create a JSON config file
Feel free to copy and paste this script on a text editor like notepad (windows)
Feel free to make any changes to the strings to suit your requirements. Keep the case-sensitive JSON attributes intact and take care of the constraints for each attribute. Else you might see an error.
Save the file with a ‘.json’ extension. Make sure to select ‘All files’ as the file type.
{
"LocalizationData": [
//First language specification
{
"Language":"en-us",
//Title: Text customizable. No custom formatting. Max: 75 chars
"Title":"This email might contain sensitive information, please review!",
//Body: Text customizable. Plain text formatting (bold, italic, underline and line break supported). Max: 1000 chars. You can add these dynamic variables too in the body: %%MatchedRecipientsList%%, %%MatchedLabelName%%, %%MatchedAttachmentName%%
"Body":"You are trying to send potential <Bold>sensitive information</Bold> to non-approved recipients.<LineBreak />Please review the recipient(s) (<Bold>%%MatchedRecipientsList%%</Bold>) <Italic>before sending</Italic>.<LineBreak />You can also submit one of the justifications below.",
//Options: Applicable when you choose allow override with justification. No text formatting or dynamic variables supported. Up to three options allowed in each language, four if HasFreeTextOption = true. Each option to not exceed 100 chars.
"Options": [
"Recipients are part of a partner org",
"My manager is aware and has approved",
"Other"
]
},
//Second language specification
{
"Language":"es-es",
"Title":"Este correo contiene información sensible!",
"Body":"Estás enviando información corporativa a recipientes no autorizados: <Bold>%%MatchedRecipientsList%%</Bold><LineBreak />. Por favor revisarlos <Italic>antes de enviar</Italic>.<LineBreak />También puede ingresar una justification.",
"Options": [
"Destinatarios son parte de una sociedad",
"Mi gerente aprobó enviar al desinatario",
"Otra"
]
}
//Up to 10 languages can be added
],
//Makes a free text box available for justification but ensure there is atleast one justification option added to each language to be displayed on top of the free text box
"HasFreeTextOption":"true",
//Set a default language for the dialog mandatorily
"DefaultLanguage": "en-us"
}
Customizable Oversharing dialog
2. Upload the JSON using below cmdlet or Purview UX
$content = Get-Content “Path to JSON"| Out-String
The above set of DLP predicates unlock many AIP scenarios like detecting an unlabeled message body with unlabeled attachments, detecting an unlabeled attachment (say except pdf files) with specifically labeled message body, and so much more.
Known limitations
Existing Content contains predicate might NOT work with new predicates.
Policy in test mode might NOT show the right warning dialog when user clicks Send – Rollout in a week
Upcoming features
2 new DLP predicates for Policy tip, Oversharing and Transport DLP – Message contains & Attachment contains SITs/labels
Two new dynamic variables or tokens for custom dialog (%%MatchedLabelName%% and %%MatchedAttachmentName%% – Rollout in March
DLP Purview UX configuration capability for all new features – Rollout in March
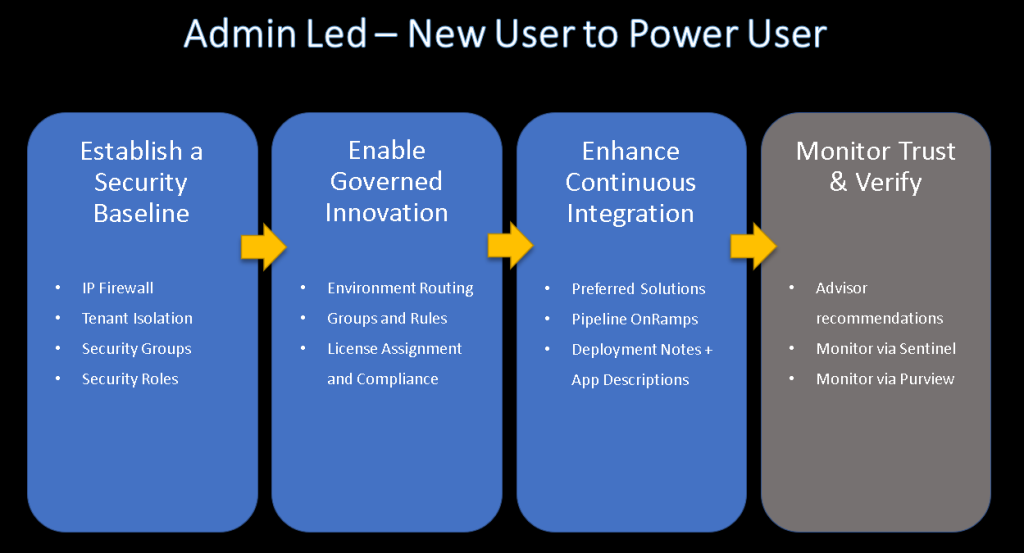
In this article, we will learn how to use the Power Platform to build and manage low-code applications at scale. We will cover four main topics:
How to establish a security baseline for your low-code estate using tenant isolation and IP firewall.
How to enable governed innovation for your makers using environment routing and environment groups.
How to enhance continuous integration for your apps using Power Platform pipelines and ALM tools.
How to trust and verify your low-code operations using Microsoft Sentinel and Microsoft Purview.
Security baseline
The first topic is how to create a security baseline for your low-code estate. This means ensuring that your apps and data are protected from unauthorised access and malicious attacks. To do this, you can use two features: tenant isolation and IP firewall.
Tenant isolation allows you to control the business-to-business interaction between your Power Platform tenant and other tenants. You can create policies to allow or block specific tenants from accessing your data sources and connectors. This way, you can prevent data leakage and cross-tenant attacks.
IP firewall allows you to restrict the IP ranges that can access your Power Platform environments. You can create rules to allow or block specific IP addresses or service tags. This way, you can prevent unauthorised access and denial-of-service attacks.
To enable these features, you need to go to the Power Platform admin center and navigate to the policies and settings pages. You can also learn more about them from the links below:
The second topic is how to enable governed innovation for your makers. This means empowering your makers to build low-code apps with the Copilot and other tools, while ensuring that they follow the best practices and standards of your organization. To do this, you can use two features: environment routing and environment groups.
Environment routing allows you to direct your makers to their personal dev environments when they create new apps. This way, you can avoid cluttering the default environment with many apps and data sources. You can also control the connectors, licenses, and expiration policies for the personal dev environments.
Environment groups allows you to organize your environments into logical sets based on your criteria. You can create groups based on organizational structure, functionality, or lifecycle stage. You can also apply rules to the groups to configure the managed environment settings, such as sharing limits, maker onboarding, solution checker, and pipelines.
To enable these features, you need to go to the Power Platform admin center and navigate to the environment groups and tenant settings pages. You can also sign up for the preview and learn more about them from the links below:
The third topic is how to enhance continuous integration for your apps. This means ensuring that your apps are tested, validated, and deployed in a consistent and reliable way. To do this, you can use two features: Power Platform pipelines and ALM tools.
Power Platform pipelines allows you to automate the movement of your apps from personal dev environments to user testing and production environments. You can use predefined templates or customize your own pipelines to suit your needs. You can also integrate IT checks and balances and certify your apps before they are shared broadly.
ALM tools allows you to manage the life-cycle of your apps using source control, versioning, and collaboration tools. You can use tools such as GitHub, Azure DevOps, or Power Platform CLI to develop, test, and deploy your apps. You can also use tools such as Solution Checker, Power Platform Test Studio, or Power Apps Review Tool to improve the quality and performance of your apps.
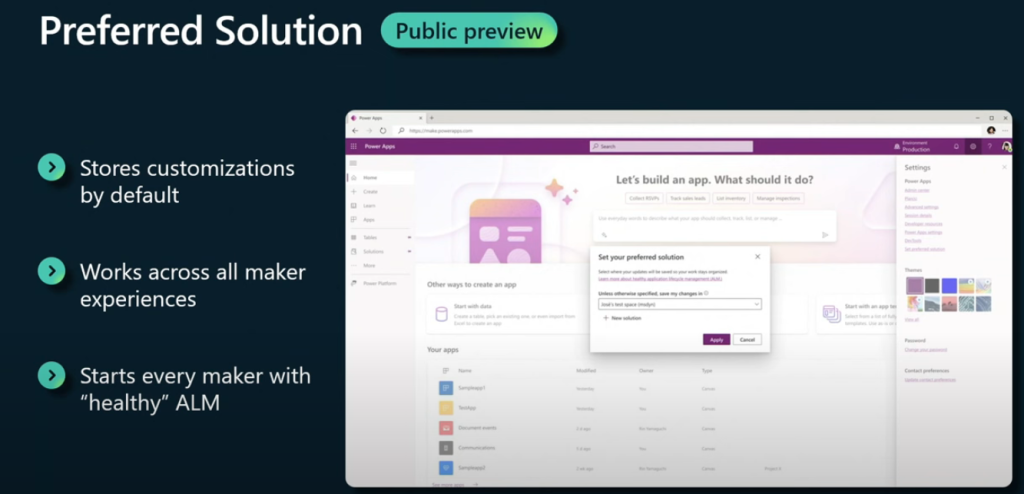
Preferred solution: This feature allows you to automatically add every app that is created in an environment to a solution, which is a container that holds the app and its dependencies. This way, you can ensure that your apps are always ready to be deployed to other environments using ALM tools, and also avoid the hassle of manually adding them to solutions later.
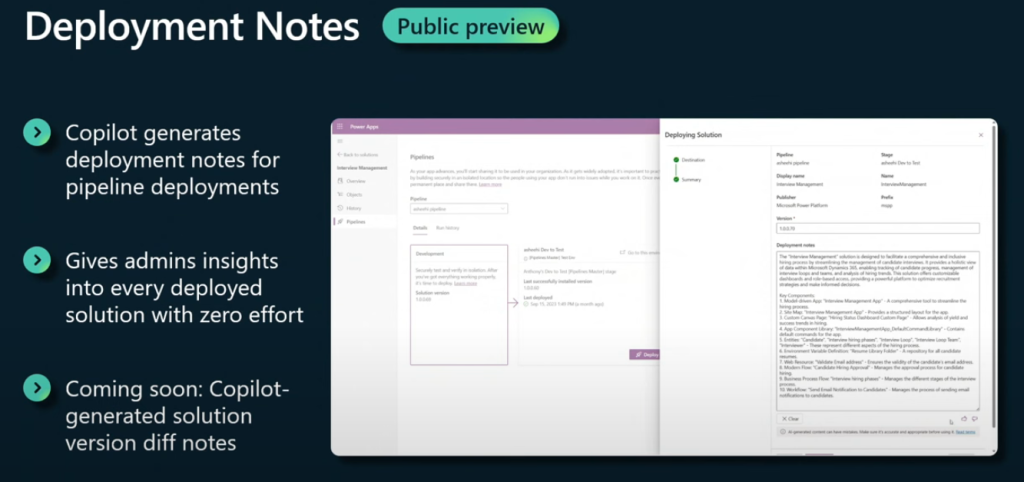
Deployment notes: This feature allows you to use Copilot, an AI assistant, to generate deployment notes for your apps, which describe the changes and updates that are included in each deployment. This way, you can provide more information and transparency to your downstream stakeholders, such as testers, approvers, and end users, and also avoid the hassle of manually writing deployment notes.
To use these features, you need to go to the Power Platform admin center and navigate to the solutions and pipelines pages. You can also learn more about them from the links below:
The fourth and final topic is how to trust and verify your low-code operations. This means ensuring that you have visibility and insight into the activities and events that occur in your low-code estate. To do this, you can use two features: Microsoft Sentinel and Microsoft Purview.
Microsoft Sentinel allows you to monitor and analyze the security incidents and alerts that happen in your Power Platform tenant. You can use built-in or custom connectors to ingest data from various sources, such as audit logs, DLP events, or threat protection alerts. You can also use dashboards, workbooks, or notebooks to visualize and investigate the data.
Microsoft Purview allows you to discover and catalog the data assets that are used by your Power Platform apps and flows. You can use scanners to scan your data sources, such as Dataverse, SharePoint, or Azure SQL. You can also use the Purview portal or the Power Platform admin center to browse and manage your data assets.
Auto-claim policy: This feature allows you to integrate Power Platform licenses with the Microsoft 365 admin center, where you can create a pool of licenses that can be automatically assigned to users who launch premium apps. This way, you can reduce the friction and delay of manually assigning licenses, and also monitor and manage the license usage and availability in one place.
License request: This feature allows you to integrate Power Platform licenses with the Azure portal, where you can create a workflow that enables users to request licenses for premium apps, and administrators to approve or reject them. This way, you can have more control and visibility over the license distribution and consumption, and also customize the workflow according to your needs.
These features are available in the Microsoft 365 admin center and the Azure portal, where you can configure and manage your Power Platform licenses.
In this article, we have learned how to use the Power Platform to build and manage low-code applications at scale. We have covered four main topics: security baseline, governed innovation, continuous integration, and trust and verify. We hope that you have found this article useful and informative. If you have any questions or feedback, please feel free to contact us. Thank you for reading
When creating Choice option set columns, create them at Global Choices for reusability.
Would a Lookup column be better? Main Pros/Cons:
Choices
For elements that are usually static (e.g. Gender)
Adding new items will require a release.
Easily deploy to target environments with solutions since items are considered as metadata whereas tables are data (but can easily import as well with Configuration Migration Tool)
Simpler UX in model-driven apps (irrelevant in canvas apps) as Choices are rendered as simple drop downs
Out-of-the-box multi-language support
Lookups
My preference. Future thinking, tables give more flexibility, especially if eventually need more metadata (e.g. Display Order). So many times, I had to convert and deprecate Choices to Lookups instead.
Supports out-of-the-box cascading drop down behaviors
Brief Rationale
For future proofing, you’ll never know when that Choice will become useful for another table or column
10 Guideline
When requiring many-to-many (N-N) relationships between data/tables, know your options as there are 3 methods:
Multi Choices multi-select option sets – simplest but most limited
Out-of-the-box N-N relationship – simpler UX but limited
Custom N-N relationship – a junction/intermediate table with Lookups on the two tables. More complex to set up but more flexible to change. My preference because can capture additional info about the relationship such as “Relationship Type” whereas is not supported with out-of-the-box N-N relationship. Gain more control with extensions (e.g. plugins).
Brief Rationale
Future proofing. Will give you more flexibility as your system evolves. Changing a column afterwards is difficult.
12 Guideline
Consistency (applies for Extensions as well)! This is something I’m very strict on. Discuss with your team and ensure consistency with naming conventions, form design, etc. Some of common easy standards are:
Prefix Power Automate flows and classic workflows (e.g. “Notifications – Follow-up on case with customer”)
Lower case on physical names of tables and columns. The developers will thank you! This will simplify their life especially when using the Web API.
Suffix date time columns with “On” to follow Microsoft naming conventions (e.g. Created On). You don’t want a mix of styles like Created Date, Date Created, Created On!
Brief Rationale
Because you’ve done such a good job delivery awesome apps, as your system evolves having consistency will pay off and make it easier to maintain, understand, etc.
Better UX
13 Guideline
Hide model-driven command bar buttons if not used. Example:
If possible, hide buttons with privileges (e.g. hide New button with create privilege) otherwise can easily hide with the Ribbon Editor
Brief Rationale
Better UX with less clutter, confusion and potential issues.
14Guideline
Automate any background (async) processes with Power Automate instead of classic workflows.
More info: https://docs.microsoft.com/power-automate/replace-workflows-with-flows
Following the same principle as #4, prevent all-purpose Power Automate flows. Scope flows to perform a single task based on a clear concise set of inputs and outputs. Register the flow on the exact step, fields/columns and rows/records filters:
Brief Rationale
Classic workflows are getting phased out. A cloud flow will also give you much more capabilities to automate.
Better scalability, performance and maintainability.
15Guideline
Create custom roles based on the out-of-the-box “Basic User” security role.
There are different ways to model security; business/title-based roles and/or Add-on or feature type roles. For example:
– “Export to Excel” role with just export to excel privileges versus
– “Customer Service Manager” with all the privilege the manager required to perform its tasks. A topic for the future, but analyze which is best for your needs!
Brief Rationale
Ensures custom roles have the minimum set of privileges for users to use the system.
Microsoft Docs is often the first go to place if we want to get How Tos and more information on best practices. For instance, if you haven’t seen the following pages on Power Platform Guidance, ALM and Administration, they’re great and suggest going through them:
For new, junior and even seasoned developers, there are some concepts that can be hard to grasp and determine the best practices to quickly get started on the Power Platform journey. Here are my top 15 best practices every developer must know when configuring the Power Platform with a focus on Dataverse. I gathered these from common questions/errors seen in the community and from past experiences. These are based on Configuration — configuring the platform with out-of-the-box capabilities (i.e. no code), and next article will be on Extensions — for pro developers and extending the platform using code.
1 Guideline
Always provision Dataverse in a new instance and never install Dataverse in the Default environment even for non-production environments. Licenses are not per environment but storage, so extra storage the environment(s) take are negligible.
More info: https://docs.microsoft.com/power-platform/guidance/adoption/environment-strategy
Brief Rationale
This is mainly because all licensed users will automatically be added to Default environment with customizing privileges (i.e Maker role) which can be dangerous.
2 Guideline
Change the default publisher prefix on both “CDS Default Publisher” and “Default Publisher”.
Brief Rationale
There’s always someone (including yourself!) that by mistake configured a component outside of a solution. If prefix isn’t changed then it will be named the default prefix (e.g. new_ or cr43e_).
3 Guideline
Perform your changes in a solution. Solutions are great to track your changes (including Power Automate, Agents, Dataflows, etc) and are used to promote your completed changes to another environment such as production. Only add sub-component level for existing components.
More info: https://docs.microsoft.com/power-platform/alm/segmented-solutions-alm
There’s a lot more that can be said about managed/unmanaged solutions, deployments and ALM but it’s for another topic!
Brief Rationale
Risk of unexpected behavior after a releasing. Risk of releasing components that are not ready and overwriting changes made from others.
4 Guideline
Create small apps (model-driven or canvas apps) instead of large apps. For model-driven apps, only associated the required components (e.g. forms, views, tables, etc) to the app.
For example, instead of having one large “CRM” app, split into smaller ones such as “Customer Service” and “Sales” and assign / share the “Customer Service” app to Customer Service users and salespeople the “Sales” app.
Brief Rationale
Future proofing. Will allow for better flexibility/maintainability and less risk of regression as changes are made.
Better UX with leaner and cleaner focused apps.
5 Guideline
Do not re-create custom Account, Contact or User tables. Reuse the ones out-of-the-box and create new forms, views, etc for them. Update the names if need be. For instance, it’s quite common to rename Account to “Organization” or “Company” and Contact to “Person” or “Individual”.
Brief Rationale
As the system evolves, will allow you to adopt new features and eventually leverage existing features that weren’t necessary before.
6 Guideline
Create new tables with ownership as “User or Team”. Only exception cases where tables are Organization owned.
Brief Rationale
Future proofing since this option cannot be done change after the table is created. Will give you more flexibility around security and privacy as your system evolves.
For instance, there’s a Timesheet table as Org owned which users have access to manage their timesheets. Later, you want to enhance security so that users only have access to their own timesheets and not the others. It would have been possible if the table was configured as “User or Team”, but not as Org.
7Guideline
Business units (BU) are used to segregate data for security/privacy purposes, so organize your BU structure based on your security groups, not on your organisation structure. If you don’t have these security requirements, don’t configure BUs, but at a minimum create a child BU for your users.
Brief Rationale
BUs are complex to amend, over configuring BU imposes restrictions. For future proofing, leaving the root BU free with one direct child BU enables easier introduction of BUs later.
8 Guideline
When creating Lookup columns, set the Display Option to “None”. Add it manually if required in the Related tab of model-driven forms.
If you don’t need the Related tab, hide it.
Brief Rationale
Better UX and avoid of having lots of junk in the Related tab. Example:
Hola, bueno si has llegado hasta aqui supongo que te interesa el tema, este proceso describe como crear una imagen de una máquina virtual en ejecución tanto Linux como Windows. Empecemos pues …
En primer lugar es importante recordar que el proceso de crear y desplegar una imagen en Azure puede causar al igual que en una red fisica, la colisión de varias máquinas, tanto en configuraciones de IPs y tarjetas de red, como en nombres de maquinas conviviendo en la misma red. Ten esto en cuenta cuando despliegues tus nuevas imágenes.
En este articulo intentaré cubrir las principales tareas que pueden darse en este proceso y que incluyen:
Sysprep y generalizar la máquina virtual
Crear una imagen personalizada desde una máquina virtual ya existente.
Crear una nueva máquina virtual desde una imagen personalizada
Listar todas las imagenes existentes en una suscripcion de Azure
Eliminar una imagen personalizada
Consideraciones, como mencionaba al principio, hemos de tener en cuenta el sistema operativo y la ubicación para el despliegue de nuestras VMs, asi pues consideraremos dos formas de crear nuestra imagen (Generalizada / Especializada) :
Generalizada: [Sysprep y creación de imagen] – Este proceso se recomienda para maquinas Windows, donde crearemos una version generalizada del SO y la utilizaremos para crear nuestras nuevas máquinas clonadas. Este método tiene como ventaja la posibilidad de clonar las VMs pero utilizar nuevos nombres de usuario, contraseñas, nombre de máquina, etc. De forma que nuestras copias puedan convivir en la misma red. En este caso la máquina original quedará inutilizada para su proposito inicial, pero podremos desplegar y configurar nuevas máquinas que la sustituyan, esto se debe a que despues del proceso de generalización la VM original ha de permanecer detenida para la creación de las imagenes correspondientes.
Especializada: [Capturar un imagen desde una VM] – Este método permite la operación anterior de clonado o creación de la imagen, más la posibilidad de capturar una imagen directa de una máquina en ejecución y crear nuevas copias. En este caso las máquinas serán copias exactas del original incluyendo el contenido de los discos, nombre de máquina, etc. Estos detalles hacen dificil que la misma máquina pueda co-existir en una red con otro de sus clones, en el caso de equipos Linux esto es más facil de conseguir y bastará con cambiar el nombre de la VM y asegurarnos de obtener las IPs de red a través de DHCP, por tanto se recomienda para este tipo de SO.
Para completar el proceso, de creación de la Galería de Imágenes podremos utilizar el portal de azure, Azure Cli, o el modulo Az de windows Powershell. Inicialmente veamos Azure Cli, puedes utilizar la version web para crear la galeria inicial de imágenes.
az sig create –resource-group myGalleryRG –gallery-name myGallery
Una vez creada la Galería comenzaremos a crear nuetras propias definiciones de imágenes. Una galería por tanto contendrá una serie de definiciones que representarán los distintos tipos de imágenes que estarán disponibles, por ejemplo clasificándolas por su funcionalidad, tipo, etc.
Obtendremos el ID de la máquina a clonar: az vm get-instance-view -g myVmRG -n myVmName –query id
Crearemos nuestra definición de imagen: az sig image-definition create \ –resource-group myGalleryRG \ –gallery-name myGallery \ –gallery-image-definition myImageDefinition \ –publisher Azure \ –offer WebAppsServer \ –sku Standard \ –os-type Windows \ –os-state generalized
Como siguiente paso tras la definición de nuestra imagen, procedermos a capturar la máquina de origen, para esto podremos aplicar las siguientes recomendaciones. Con respecto al proceso de generalización, puedes ver las opciones en los siguientes enlaces:
Recordarte que en el caso de VMs Linux, puedes prescindir del proceso de generalización, siempre y cuando cambies el nombre y las IPs asociadas a los clones desplegados. Una vez completada la generalización de nuestra máquina original, tendremos dos posibles estados:
1. VM apagada, en estado generalizado, normalmente máquinas Windows. 2. VM encendida, sin generalizar (especializada), normalmente máquinas Linux
Podremos proceder por tanto a la captura de la primera versión de nuestra definición de imagen. Según este principio, crearemos nuevas versiones de la imagen, siguiendo por ejemplo la evolución del software o funcionalidad de la máquina clonada.
En este punto habremos generado una definición de imagen desde la que podremos desplegar nuestros clones, mencionar que en este caso, ya que las maquinas han de estar configuradas para su alta disponibilidad, se dará la posibilidad de elegir la zona de despliegue en la creación de el/los clones de la máquina virtual.
Desde el portal de Azure, en la sección de definición de la imagen se podrá a partir de ahora, crear una nueva máquina basada en una de las plantillas mencionadas, simplemente con seleccionar la opción “Nueva VM”
Espero escribir nuevas partes de este artículo para incluir el proceso de despliegue utilizando el Cli de Azure y posteriormente utilizando plantillas ARM e imágenes administradas como las que acabamos de crear.